Love 3D animation, good that means you are also interested into the softwares used to make 3D stuffs. I am sure you heard about many softwares which is used to create 3D like 3ds Max, MAYA, Ligtwave 3D, etc.
Details about other softwares are easily available on Internet with good tutorials, but if we talk about LightWave 3D, we didn’t find good stuffs/tutorials on Internet. In India, LightWave 3D is not very popular and you hardly find people who worked on LightWave 3D. I got chance to work on LightWave 3D during my work assignment, still I am using the same. In starting of my project I had tried to search some good tutorials on LightWave 3D, but not succeeded. I got only Newtek company (makers of LightWave 3D) tutorial section, which was not working during that time. Luckily, I got some video tutorial on Newtek website and also with the copy of my LightWave 3D.
Approach of 3D in LightWave is little bit different as compare to 3ds Max and MAYA etc. Cost wise differences between these three softwares are:
Autodesk 3ds Max 2009: $ 3990 (with Subscription Electronic Download)
Autodesk MAYA Complete 2009: $ 2590(Windows with Subscription Electronic Download)
Autodesk MAYA Unlimited 2009: $ 6490(Windows with Subscription Electronic Download)
LightWave v9 Full with Printed Manuals: $ 995
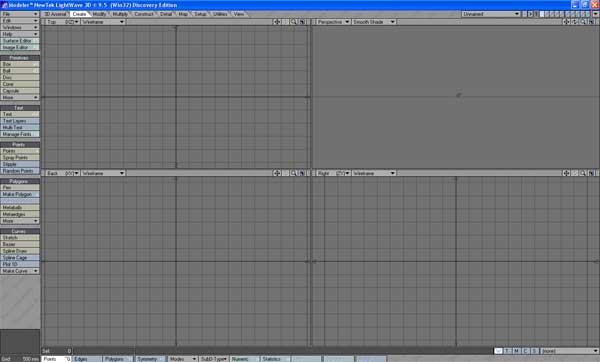
In LightWave 3D software you will get two different section i.e. Modeler and Layout; one is for modeling and other one for Animation and texturing (advance use).
Let’s discussed about the Modeler first.
Modeler
It meant for modeling and generation of 3D models and characters.

This program has different sections such as ‘Create’, ‘Modify’, ‘Multiply’, and ‘Construct’, ‘Detail’, ‘Map’, ‘Setup’, ‘Utilities’ and ‘View’.
Inside theses sections you will find all options of creating a box, ball, toroid, gear etc., which will be useful for creating 3d models. Other useful actions such as Boolean, Bevel, Extrude, Lathe and others are also present.
In Modeler, you can also adds lots of Plugins, some useful plug-in such as ‘3D Arsenal’ (wait for my next article on 3D Arsenal). Inside Modeler, one can create models and apply textures of different kinds. Modeler has Surface preset, which is very useful and easy for texture mapping, you can assign textures with just a click, nice feature.

A different approach of Lightwave 3D in comparison with other 3D softwares is layer systems just like Adobe Photoshop.
Create a 3D model, name it and also name its surfaces. After completing your model, you need to go to Layout. For Layout you need to click the button on the right side corner of the screen. On this menu, you will find options such as ‘Switch to Layout’; ‘Synchronize Layout’ and ‘Send Object to Layout’. After a click you will be into Layout….
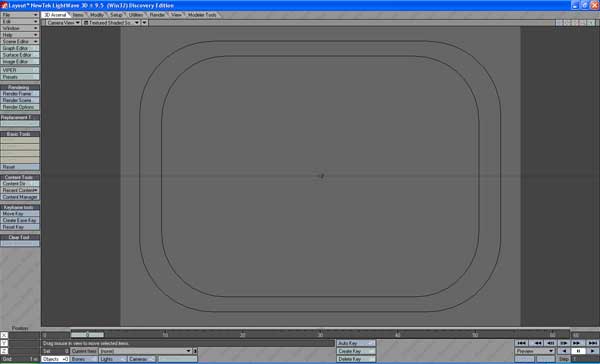
Layout
Layout is meant for animation and effects purpose only. After coming here you can’t change the model or do alteration; if you want, than you need to go back to Modeler with the help of button on the top right side of the screen.

In layout mode you will not find layers, the new thing here is camera, lights, animation timeline and animation panel on bottom with other useful tools. Here you can use functionality such as Bones, IK etc. And with the Render tab you can render animation with different option settings available.
Tabs under Layout modes are ‘Items’, ‘Modify’, ‘Setup’, and ‘Utilities’, ‘Render’, ‘View’ and ‘Modeler Tools’. These tools help to provide lights, camera and dynamic objects settings in a scene. IK, Bone management and Pivot point positioning is also possible in Layout mode. Lightwave script and Plug-in support is available in Utilities tab.
Here, in this mode you will find surface editor same as Modeler. So you can change the surface color/texture at any time. Important point in Lightwave 3D as compare to 3ds Max and other tools is that, when you create any object give its surfaces name. This will solve lots of complexity during texturing. And if your surfaces are having names, just select any specific surface and you can change the texture or color for that particular surface.
Finally my view is that Lightwave 3D is cost wise very cheap as compare to other 3D software and also very effective. Important thing, you can get Cloth, Hair and other effects totally free, which is very costly and comes separately in other 3D softwraes. This is just a small description of Lightwave 3D from my view. For more and specific details about Lightwave 3D please visit Newtek website: http://www.newtek.com


 Are you worried when your client wants hi-ended 3D animation for small section of your animation/video? Don’t you think that it would be great to have some amazing templates of 3D animation effects? A 3D animator knows how painful is to make a effective 3D Logo animation which has to be shown just for a second in an animation, for this he/she needs to develop all 3D background and other models with texturing, animations, effects and rendering. And above scenario is worst nightmare for a video editor who doesn’t know 3D.
 Once you find 3D Arsenal™ tab inside LightWave 3D®, just click that 3D Arsenal™ tab, and select a pre built 3D scene from template. Selected pre built scene loads into your LightWave 3D®. You just need to type text on Logo’s place so yours text become new logo. You can also edit textures, design of anything in the templates according to your needs. This has the facility to add videos into surfaces of 3D models such as backdrops, screen etc. You can place a dancing girl video with alpha channel in between the virtual sets. Take your video shots with blue/green screen and use pre-made customizable 3D environments provided in 3D Arsenal™. Map your video onto plasma screens, dancing TV’s, video walls and more, to give your productions a real primetime look.
 After mapping logo or video into pre-built scenes you just need to render your project and you will get final 3D animation output… Isn’t it very easy. Instead of creating each thing in 3D you just need to map the required video/logo etc. into pre built templates.


