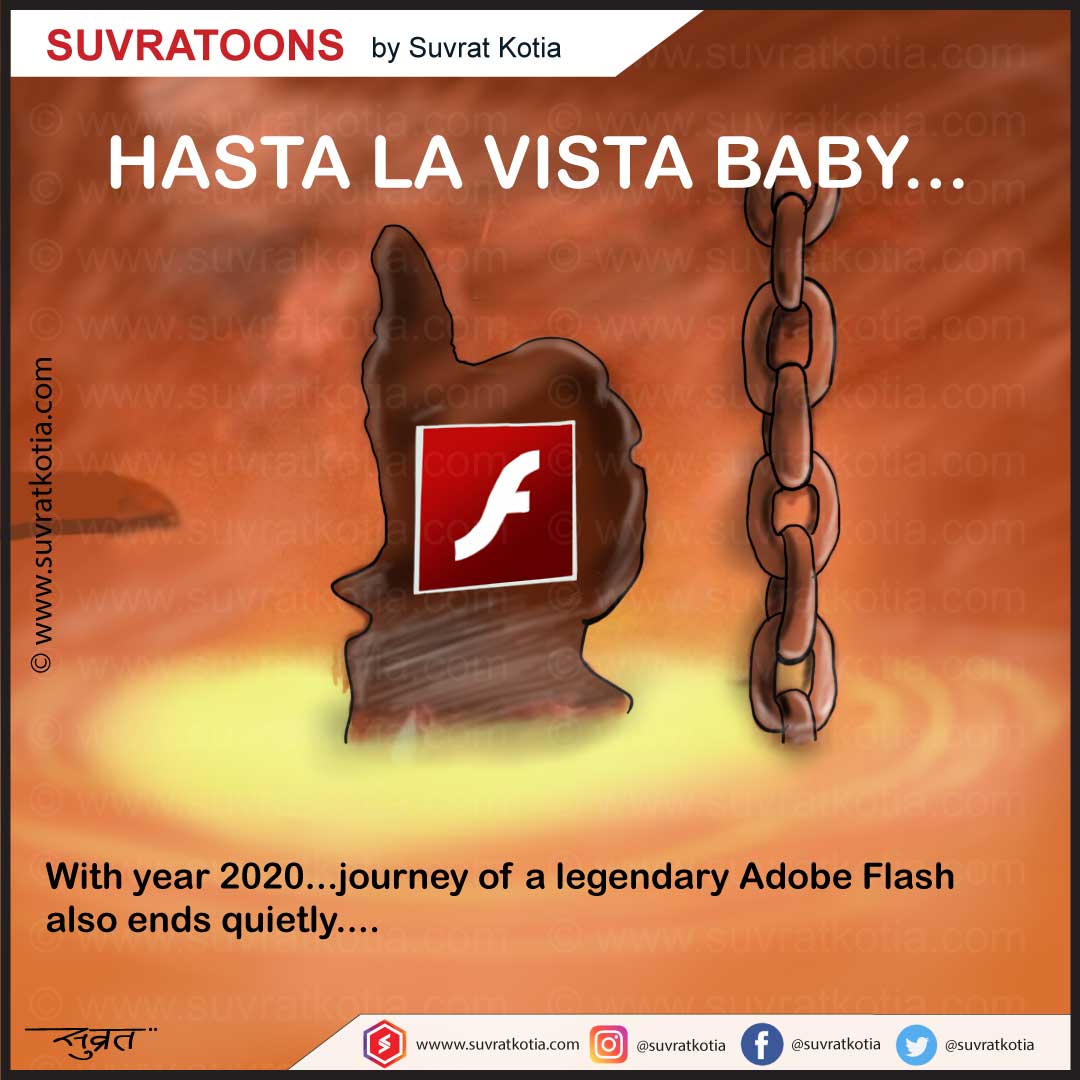
SUVRATOONS – Adobe Flash reaches end of life, those who started their careers in late 90’s and early 20’s know the power of Adobe Flash (previously known as Macromedia Flash)…with year 2020 ending, this legacy application was also end quietly….we just have it’s memory now. Adobe Flash reaches end of life, let me know your views…
My tribute with my cartoon (suvratoons) to legendary Adobe Flash….
#adobe flash eol, #adobe flash player end of life, #adobe, Adobe Flash reaches end of life
If you are thinking to buy FASTag sticker, this article is for you. This is new initiative by National Highway Authority of India, an electronic tool payment system. FASTag – Digital payment on tolls and this make your travel much faster and convenient.
It’s available in market by some providers like Paytm, Sate Bank of India (SBI), HDFC Bank, ICICI Bank and many more. Here I am going to tell you about the Paytm FASTag and how to get it and use it.
Each person is having a special bond with animations, whether that is cartoons, serials, games or movies. But do you know what exactly animation is? How these animation movies, serials are prepared? Here we discuss about Animation, with special perspective on 3D animation.
Mobile!!! when you went to buy a mobile and got this much knowledge about mobile and it’s technologies….so what do you expect? Diploma instead of mobile…is’n it? Can you guess which mobile this salesman is talking about?
Just subscribe to www.suvratkotia.com for interesting cartoons and articles….
Here is a content which you can use to give presentation on social media. You can use this content to create your PowerPoint presentation, I will be happy to help you.
Now a days many parents are using Microsoft Team for their kids’ online classes. With technologies comes issues, and during such issues no one is available to help you except GOOGLE.
Here I am discussing unique problem. It’s for Microsoft Team desktop app (issue is same for mobile as well), let see:
Details about Microsoft Excel and how to set macros to work smartly and faster. During one of my assignments, I got a huge list of MS Excel name with hyperlinks on them. Now I need to extract URL and name separately, manually its very tough but through Excel formula and macros it’s a cake walk 😊
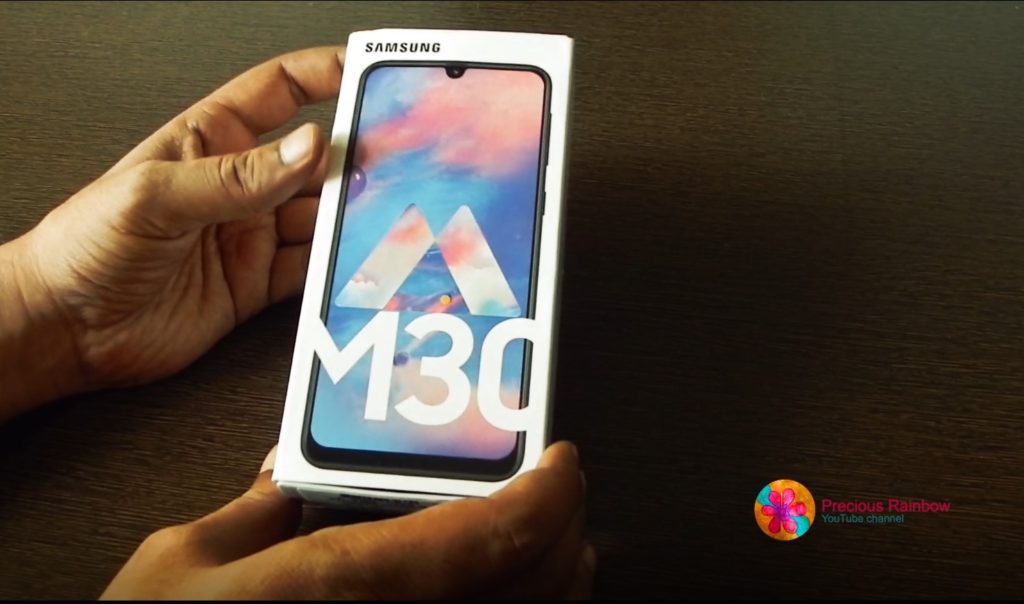
Just brought a Samsung M30 mobile during festival season in India within my budget range, but it’s not for me. Want it for basic purpose and don’t want to spend a bomb.
Features:
Powerful Display: 16.21cm (6.4″) FHD+ super AMOLED
Powerful Camera: Rear: Triple Camera, Front: 16MP Selfie Camera
Powerful Battery: 5000mAh battery with USB C Fast Charging
RAM: 3GB
Storage: 32GB
Dual SIM, GPS, Music Player, Video Player, Accelerometer, Fingerprint sensor, Gyro sensor, Geomagnetic sensor, Proximity sensor
Weight: 172 Grams
In the box: Handset, Travel Adapter, USB Cable, Ejection Pin and User Manual
Color: Metallic Black
Pros:
Powerful camera
Good battery life
No need to open complete mobile for any work, just take out SIM tray from left side and place Memory cards, SIM 1, SIM 2. Just take care(handle) this tray and don’t break it.
New USB C fast charging is very effective and does not creates any problem like previous USB, older one has teeth and during connection or removal that creates problem with inner parts of charging socket.
Cons:
Lot’s of pre-loaded apps by Samsung, and that is not few for sure.
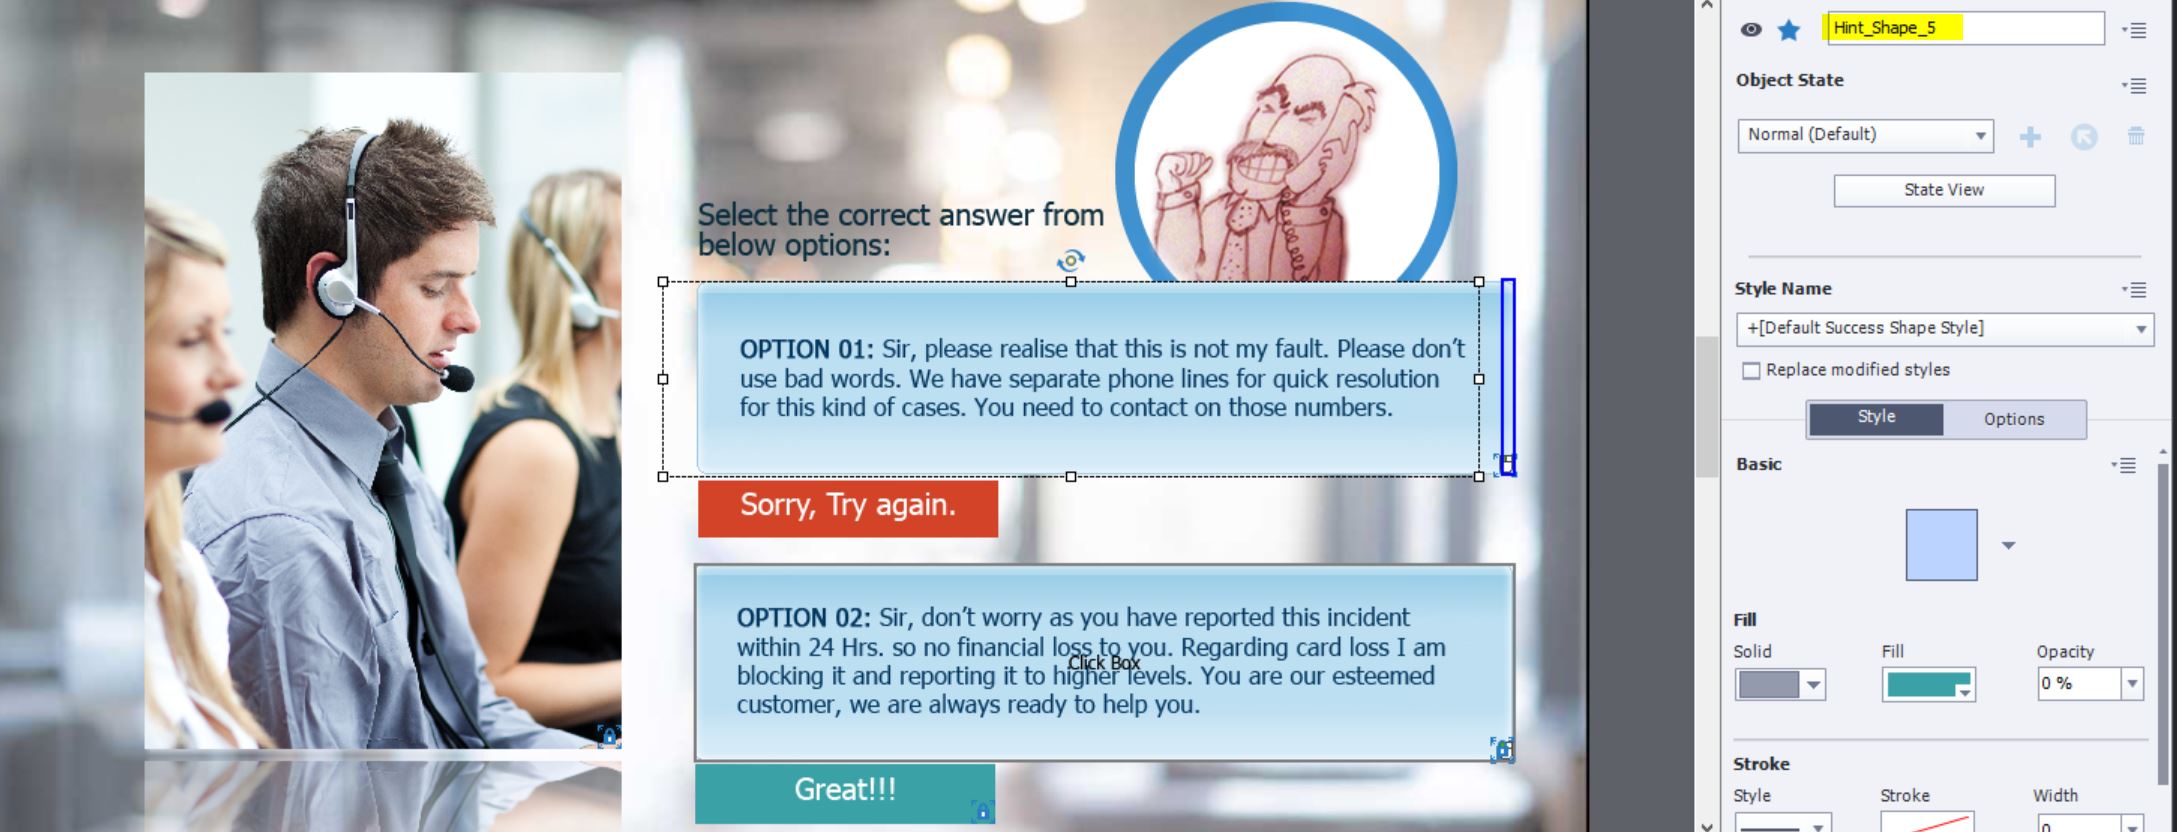
Adobe Captivate is a software which is very famous in the eLearning domain. It is useful in creating eLearning content. It has few issues, and while doing research about one such issue I had not found any proper answers on the internet, so thought to share the solution I found out during my research. We are discussing the latest version of Adobe Captivate 2019 Release. Hope you have intermediate/Advance knowledge about Adobe Captivate.
Figure 1.1: Click box with Success and Failure messages
Issue: “Failure” display is not working in “Click box” object from the “Interactions” menu.
Case: It’s a very weird problem, it seems a bug in the software itself.
When you place two text boxes as right and wrong answers, to activate it, we need to place ” Click box” from “Interactions” menu. With this “Click box” comes three text cum click areas which are “Success”, “Failure” and “Hint”.
When someone clicks on “Click box”, as per standard functionality of “Click box” one/two objects should show up (Success-Hint or Failure-Hint etc.)
But you just want to show “Success” or “Hint” then it’s fine because it will work fine. But if you want to show the “Failure” text message after clicking on “Click box” your problem starts, it will not show the “Failure” message.
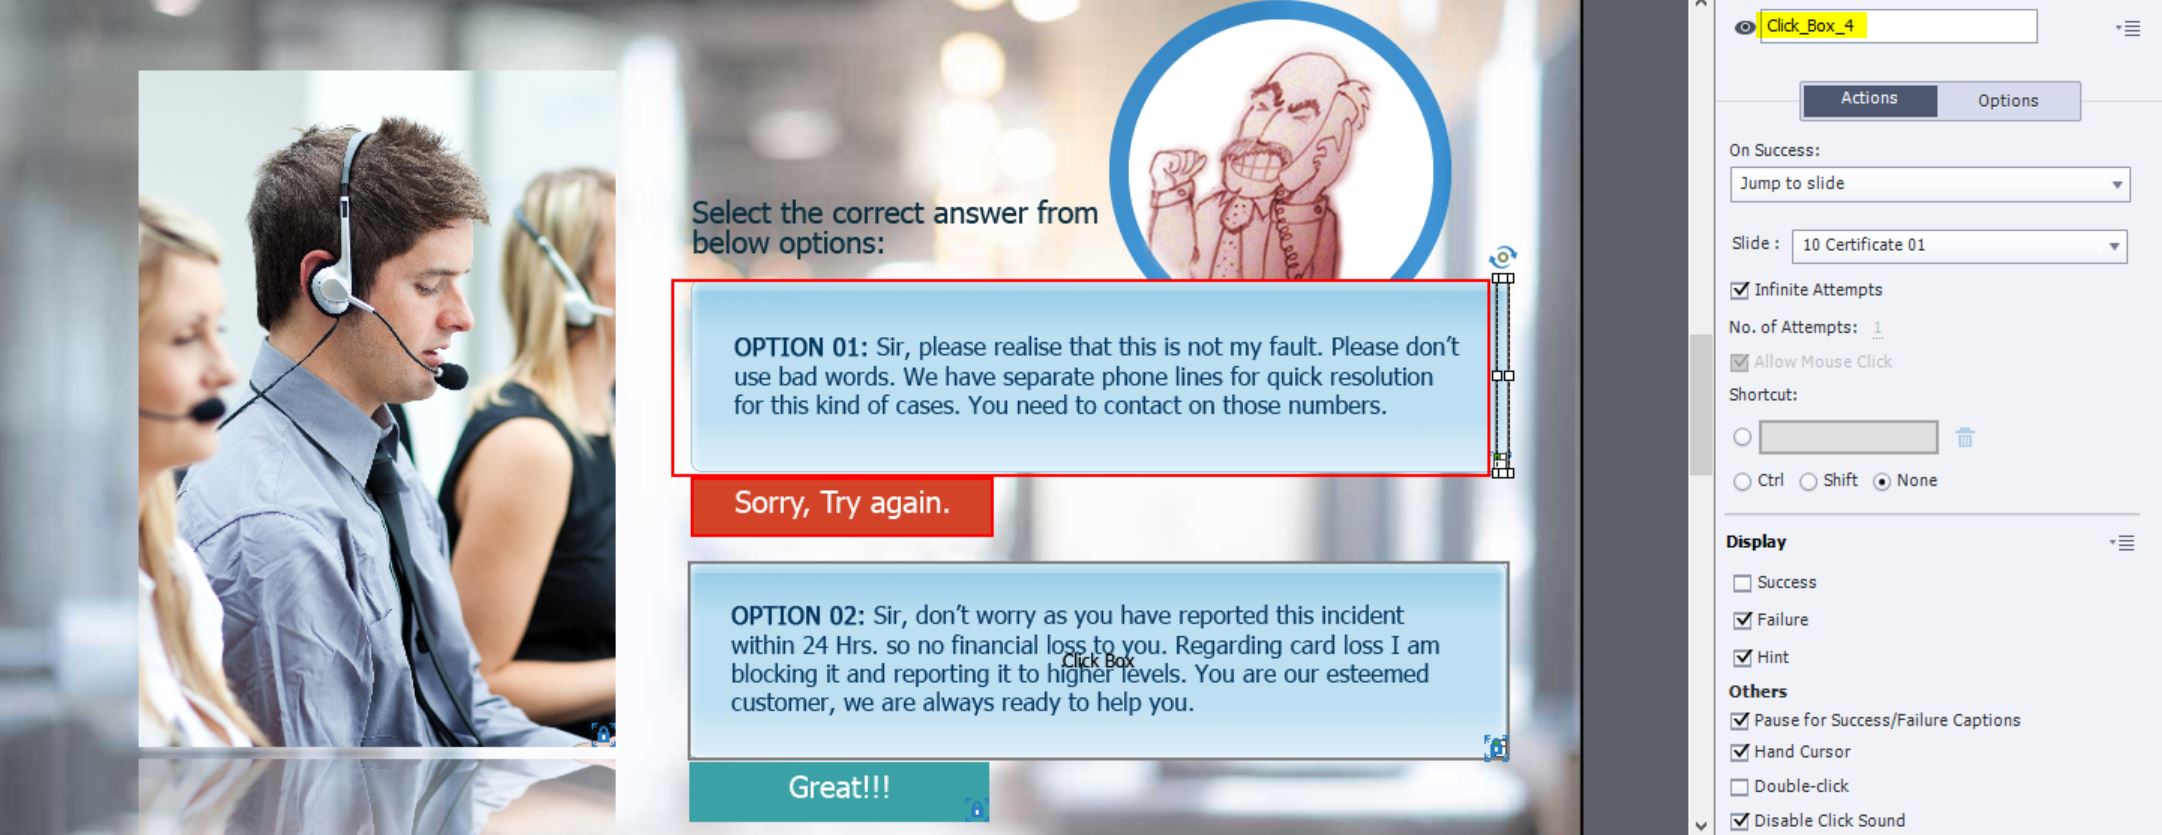
Solution:
Figure 1.2: Hint box spread over Text box which we want to show as a wrong answer, and Click box on the right side of the same Text box.
Very simple solution but little weird…..when you want to show “Failure” message, just use the “Hint” area to click and reduce the “Click box” to the minimum (don’t delete it completely)…Whoa!!! problem solved 🙂
Don’t forget to select “Success”, “Failure” and “Hint” options as per your choice from Property area on the right. Check Figure 1.3.
For “Sucess”, just place “Click box” on the text box which you think will be the correct answer. After someone clicks on this “Click box” success text will appear.
Check Figure 1.2 and Figure 1.3 for more understanding.
Figure 1.3: Hint box spread over Text box which we want to show as a wrong answer, and Click box on the right side of the same Text box.
Note: Above procedure is for students/professional/users with intermediate knowledge of Adobe Captivate 2019 and not for beginners.